How is microblading done?
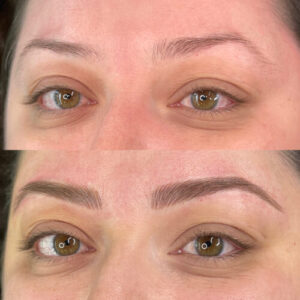
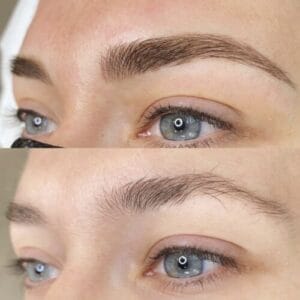
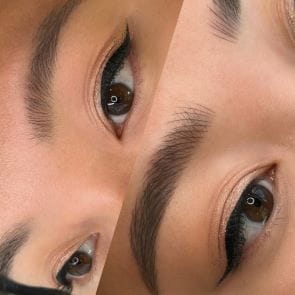
Microblading involves the precision application of hairlike strokes with a fine needle and pigment resulting in fuller, natural-looking brows. The results are undetectable to the casual observer, except your brows look amazing all the time!
We’ve all experienced the frustration of meticulously perfecting our brows in front of the bathroom mirror, only to have our efforts fade away or smudge halfway through the day. If you’re tired of this daily struggle and seek a long-lasting solution, microblading is an excellent alternative that can elevate your brow game to a whole new level.
Allow us to provide you with the essential information to embark on your journey to achieving perfect brows!
The Microblading Process in 6 Steps:
Step 1: Finding your permanent makeup artist.
A skilled permanent makeup artist (PMU Artist) will determine, based on your skin type, whether they should use nano needles or micro needles to create the realistic hairstrokes. The PMU artist also needs a steady hand and a keen sense of symmetry to get your brows perfect! If you want to know why it’s important to research an artist (and how), check out this article.
Now, let’s delve into the details of how microblading is performed.
Step 2: Consultation
To begin, your PMU artist will consult with you to get an understanding for what you hope to achieve. They will discuss exactly what the procedure will entail and make sure you are comfortable moving forward. They will then meticulously draw the shape of your brows, allowing you to approve the design before the microblading process commences. They will also apply a numbing cream, to minimize discomfort during the procedure. Your artist should always gain your approval before starting with needles and pigment!
Step 3: Mixing Pigments
While you are numbing, the PMU artist mixes pigment and chooses needle sizes. Microblading has advanced significantly over the years. New needles have been introduced that range from nano size to micro size (all very small) allowing your masterful artist to choose the best needle size to create optimal results.
Step 4: The Procedure Begins
Your microblading artist will delicately create shallow incisions in your brow area, depositing the color just beneath the skin’s surface. The key distinction between semi-permanent makeup (aka permanent makeup) and a traditional tattoo lies in the depth of color application, which is much shallower in microblading. This technique allows for achieving natural and subtle effects with significantly less discomfort. The sensation experienced during microblading is akin to eyebrow threading, and the entire process typically takes approximately one hour of your total appointment time.
Rest assured that throughout the procedure, your comfort and satisfaction are of utmost importance. Your microblading artist will prioritize open communication, ensuring that you are involved in every step and that your preferences are considered. By collaborating closely with your artist, you can achieve brows that beautifully complement your unique features and enhance your overall facial aesthetics.
Step 5: The Reveal & Aftercare
Once the microblading process is complete your PMU artist will show you the immediate results! Prepare to be very excited.
After the microblading procedure, the client’s eyebrows may appear darker than expected. We lovingly refer to it as ‘brow shock’. This is normal and part of the healing process. Over the next few days, the pigment will gradually fade to its intended shade as the skin heals.
You will then be provided with detailed aftercare instructions. Following these guidelines diligently will promote proper healing and ensure long-lasting results. It’s important to note that, initially, you may experience some mild redness or slight discomfort in the treated area. However, these temporary effects subside quickly, leaving you with gorgeously defined brows that require minimal daily maintenance.
Step 6: The Touchup
You will schedule a touchup on your way out the door. This appointment takes place 6-12 weeks after the first appointment and gives your PMU artist the chance to perfect your brows. You may or may not think you need a touchup, but everyone is even more thrilled after the touchup.
In summary, microblading offers a transformative solution for individuals seeking long-lasting, impeccably shaped brows. By entrusting your brow journey to a skilled microblading artist, you can say goodbye to the hassle of daily brow maintenance and enjoy the confidence that comes with waking up to perfectly defined brows. Take the first step and book your microblading appointment to embark on a path towards effortlessly beautiful brows that will enhance your natural beauty for years to come.
What are the aftercare instructions for microblading?
The healing process for microblading typically lasts for approximately one to two weeks, and during this time, it’s crucial to follow a simple aftercare routine to ensure proper healing and minimize the risk of infection. Due to the nature of microblading, taking extra precautions against infection is essential. Here are some recommendations to aid in the healing process:
Washing:
It is advisable to wash your brows gently with antibacterial soap both in the morning and at night. Using a mild, fragrance-free antibacterial soap, lather it up in your hands and carefully cleanse the brow area, being cautious not to rub or scrub aggressively. Rinse with lukewarm water and pat dry with a clean towel. This practice helps maintain cleanliness and prevent the accumulation of bacteria on the healing skin.
Aftercare Ointment:
After washing your brows, wait until the skin is completely dry, and then apply a tiny amount of the recommended aftercare ointment. Ensure that the ointment is specifically formulated for use on microbladed brows. Gently massage the ointment into the treated area using clean fingers or a cotton swab, making sure not to overapply. This step helps keep the skin moisturized and aids in the healing process.
Avoiding Excessive Water Exposure:
During the first week after your microblading treatment, it is crucial to avoid getting your brows wet whenever possible. Water, especially in the form of excessive moisture or soaking, can disrupt the healing process and potentially lead to complications. Take extra care to shield your brows during activities such as showering, swimming, or excessive sweating. If your brows do get wet accidentally, gently pat them dry with a clean tissue or towel.
Refrain from Touching or Picking at Your Brows:
It’s best to keep your fingers off! let the hairstrokes heal naturally and they will retain a crisp, natural look. Trusting the process is important.

Individual Healing Factors:
It’s important to note that the healing time for microbladed brows can vary depending on individual factors such as skin type, overall health, and adherence to the aftercare regimen. Everyone’s healing process is unique, so it’s important to be patient and allow your brows to heal at their own pace. If you have any concerns or questions about your healing progress, don’t hesitate to reach out to your microblading specialist for personalized recommendations and guidance.
By following these aftercare instructions diligently and maintaining good hygiene practices, you can help ensure a smooth and successful healing process for your microbladed brows. Remember, the goal is to protect against infection and provide optimal conditions for your brows to heal beautifully.
Is microblading right for you?
The final breakdown: Microblading is done with minimal pain, resulting in safe and long-lasting results. It’s a win for your morning routine and your self-esteem, saving you time and angst every single day. The long-lasting results are one of the best things about microblading. With proper aftercare, your new brows can last between 2-5 years!
Up to three years without fumbling with a brow pencil is a pretty sweet deal, making it even more important to do it right.
About DAELA Cosmetic Tattoo
At DAELA Cosmetic Tattoo, our work is rooted in trust, intention, and results that feel like you—just elevated. Over the years, we’ve had the honor of serving more than 25,000 clients locally and from around the world, building relationships that extend far beyond the treatment room.
DAELA is consistently recognized as the highest customer reviewed permanent makeup studios. With over 3,000 five-star reviews across platforms, that recognition isn’t something we take lightly—it reflects the care, artistry, and experience we strive to deliver to every single client.
You can visit us at either of our studio locations:
DAELA Scottsdale
Kierland Commons, Scottsdale, Arizona
Book your Scottsdale appointment
DAELA Portland
Downtown Portland, Oregon
Book your Portland appointment